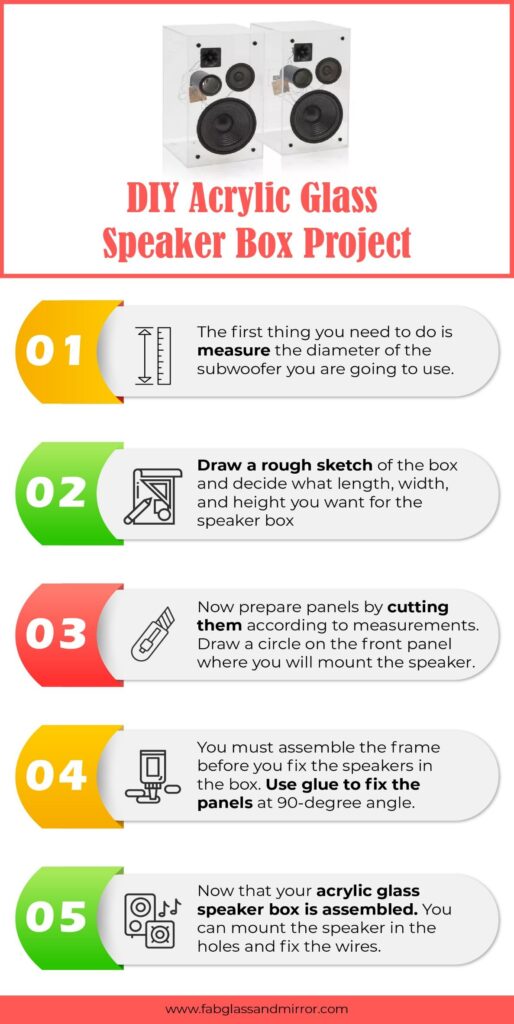
DIY Acrylic Glass Speaker Box Project to Enjoy High-Quality Sound

If you want to enjoy high-quality sound for your music, making an acrylic glass speaker box with your own hands is a great idea. All DIY projects have some challenges, and this one is no exception. However, when you have the right parts and materials, and the right guide, there’s nothing you can’t do. Today we will be looking at why color of acrylic is such great material for a speaker box and we’ll show you how you can make your own without too much effort.
Why Is the Speaker Box Made with Acrylic Glass Instead of Other Materials?
Acrylic glass speaker boxes, also known as speaker cabinets, are a great idea. They’re better than speaker boxes made out of other materials for many different reasons. First, it provides higher quality than wood or plastics. It’s easy to clean and to maintain, so it will be super durable. This material is not susceptible to water damage, it’s not fragile, and it’s not super heavy. And, perhaps the best thing about an acrylic speaker box is the aesthetic. It will look incredibly classic, sleek, and elegant.
How to Make an Acrylic Speaker: Step by Step
Step 1: Measure Your Subwoofer
The subwoofer is the speaker that will deliver sound at low frequencies. The first thing you need to do is measure the diameter of the one you’ve bought and subtract the size of the outer ring that will mount to the speaker box.
Step 2: Draw a Sketch and Calculate Panel Size

Now, you want your acrylic glass speaker box to allow at least 3 inches around the speakers. Keep this in mind when you draw the rough sketch of the box and decide what length, width, and height you want for it. You also need to make a list of all the individual parts, which should include the top, bottom, two sides, the front panel, and the back panel.
For most acrylic speakers, quarter-inch acrylic glass is thick enough, and you want to take the thickness of the glass into account when you’re calculating the size of the panels for your speaker box. The best thing to do here is to take your measurements to an acrylic retailer and have they cut the glass to the size you need.
Step 3: Prepare the Panels for Mounting
In cutting out the front panel you want to make sure to take the mounting plate into account. The next step is to draw a circle on the front panel where you’ll mount the speaker, then drill a pilot hole that’s big enough to fit a jigsaw blade so you can cut out the hole.
Mark the spots for the speaker mounting screws and drill holes using a bit that’s slightly smaller than the screws. You want to drill holes in the back panel as well, but these will be for the wires and any mountain brackets you need. Lastly, sand the edges of the panel with 220-grit sandpaper for a smooth finish.
Step 4: Start Assembling
The speaker will be mounted on the outside of the box, so you want to assemble your frame. To do that, glue one of the side panels to the top or bottom panel with a gluing jig and use clamps so the pieces are held at a 90-degree angle. You also need to apply a thin line of acrylic cement to the inside joint and let it sit for 45 minutes until it dries. Repeat this until you have the frame.
Then, take the panel and glue it to the frame by using acrylic cement and applying it to the inside joint. You won’t need a gluing jig or clamps for this. Next, glue the front panel as well, applying acrylic cement to the inside joint through the circle you’ve cut out for the speaker. Lastly, polish the edges with an acrylic buffing compound.
Step 5: Place the Speakers
Now that your acrylic glass speaker box is assembled, you want to insert the speaker wire through the hole you drilled in the back panel. Next, line up the mounting holes of the speaker, with the holes you drilled back in step 3. Insert the screws into the holes; if it’s too tight, don’t force the screws, and simply make the hole a bit larger.
Extra Tips
- If you plan on mounting your speaker box, make sure to drill additional mounting holes on the back panel.
- If you find the speaker box rattles too much when it’s being used, you should apply a ring of silicone caulking around the inner lip of the speaker ring.
- Making a DIY acrylic glass speaker box is not difficult. All you need to do is find an acrylic retailer near you, gather the rest of the supplies, and follow the steps on this guide. It’s that simple!